Implement RecyclerVIew in Android
- First you can create new project in Android Studio.
- In this you can create one more xml file and java file. Because RecyclerView Accept only RecyclerView adapter that why we create another file for REcyclerView Apter class.
- After that open the build,gradle(Module:app) and add the following Dependency:-
compile 'com.android.support:recyclerview-v7:24.2.1'
- After that add the RecyclerView Tag into avtivity_main.xml file between the Layout Tag likew that :-
<android.support.v7.widget.RecyclerView
android:id="@+id/recyclerView"
android:layout_width="match_parent"
android:layout_height="match_parent"/>
- Open the MainActivity file and declare the RecuclerView and assign the Id to the variable.
- Now i show you the code in MainActivity.class file following :-
public class MainActivity extends AppCompatActivity {

    //Declare object of RecyclerView    RecyclerView recyclerView;
    //Declare array to show into the RecyclerView
    String[] fruit={"Apple","Mango","Banana","Orange","Litchi","Pine Apple","Guava"};
    @Override    protected void onCreate(Bundle savedInstanceState) {
        super.onCreate(savedInstanceState);
//connect the xml file into MainActivity
 setContentView(R.layout.activity_main);
        //Assign the view id to the object
       recyclerView=(RecyclerView) findViewById(R.id.recyclerView);
        //pass the array and context to the RecyclerView Adapter class
       Second second=new Second(MainActivity.this,fruit);
        //set the layout of the list linear list or grid list
    recyclerView.setLayoutManager(new LinearLayoutManager(this));
        //set the data come from RecyclerView Adapter class
//and set it to RecyclerView object
   recyclerView.setAdapter(second);
    }
}- After that create an new xml file. i gave its name is second.xml. and put the following code into it :-
<LinearLayout
xmlns:android="http://schemas.android.com/apk/res/android"
android:orientation="vertical"
android:layout_width="match_parent"
   android:layout_height="wrap_content">
    <TextView
android:id="@+id/txtName"
android:textSize="26dp"
android:layout_width="match_parent"
       android:layout_height="wrap_content"
        />
</LinearLayout>
- Then Create another class file with name Second.class and put the following code into it and code description is into the code with comments:-
//extend the class with RecyclerView.Adapter<ClassName.ViewHolder>
// IN this ViewHolder is class create inside
//the second class at the end of the curly brackets
public class Second extends RecyclerView.Adapter<Second.ViewHolder> {

    //Declare the variables global
Context mContext;
String[] fruit;
// create constructor for catch the data pass by the MainActivity.java file
// and assign the value to global variables
 public Second(Context mContext, String[] fruit){

        this.mContext=mContext;
       this.fruit=fruit;
    }


    @Override    public ViewHolder onCreateViewHolder(ViewGroup parent, int viewType) {

        //using this class we can add xml file into this file
LayoutInflater layoutInflater= (LayoutInflater)
mContext.getSystemService(Context.LAYOUT_INFLATER_SERVICE);
View v=layoutInflater.inflate(R.layout.second,parent,false);
//pass the view variable to the ViewHolder Class.
ViewHolder viewHolder=new ViewHolder(v);
//return ViewHolder variable;
return viewHolder;
 }


    //In this method we set the values to textView with position
 @Override    public void onBindViewHolder(ViewHolder holder, int position) {

        // holder is an object of ViewHolder without this object
// we can't access the txtView and can't assign the values.
     holder.txtView.setText( fruit[position]);
    }


    // In this method we tell that actual size of the array
 @Override    public int getItemCount() {
        return fruit.length;
   }


    // In this class we can create the
//TextView Object and assign the id to that object
 public class ViewHolder extends RecyclerView.ViewHolder {

        TextView txtView;
  public ViewHolder(View itemView) {
            super(itemView);
      txtView=(TextView)itemView.findViewById(R.id.txtName);
        }
    }
}
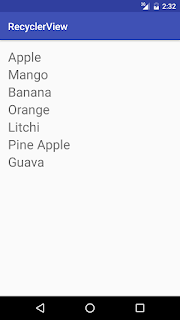
- Now you can run Application and you can get the following output :-
- I think it is quite easy so. keep Learning Android with ease....

Comments
Post a Comment